


高斯光束傳播
雷射資源指南第2.1部份
在許多雷射光學應用中,會假設雷射光束為高斯光束,具備輻照度剖面,並遵循理想的高斯分布。不過所有實際雷射光束都會偏離理想的高斯行為。 M2 係數也稱為 光束品質係數,可比較真實雷射光束與 繞射受限 高斯光束的效能。1 高斯輻照度剖面對稱環繞光束中心,隨光束(與傳播方向垂直)中心距離增加而減少 (圖 1)。此項分布以 公式 12說明:
在 公式 1, I0 為光束中心的尖峰輻照度,r 是遠離軸的徑向距離,w(z) 為雷射光束半徑,其中輻照度為 I0 的 1/e2 (13.5%) ,z 為波前平坦平面傳播的距離,而 P 為光束總功率。

圖 1: 高斯光束束腰定義:輻照度為其最大值 1/e2 (13.5%) 的位置
不過前述輻照度剖面不會維持固定,因為光束傳播通過空間,所以w(z) 需視 z 而定。由於繞射緣故,高斯光束將由所謂的束腰 (w0), 匯集與發散,而束腰就是光束直徑達到最小值的地方。光束會在束腰兩側以發散角 θ 相等地匯集與發散 (圖 2)。束腰及發散角均由軸量測,其關係可參閱 公式 2 及 公式 32:
在上述公式中,λ 為雷射波長,θ 為遠場近似值。因此 θ 無法正確表示束腰附近的光束發散,但是距離束腰越遠,正確性越高。如 公式 3, 所示,小束腰會產生更大的發散角,而大束腰則會產生較小的發散角(或是更平行的光束)。這說明為何擴束鏡可增加光束直徑以減少光束發散。
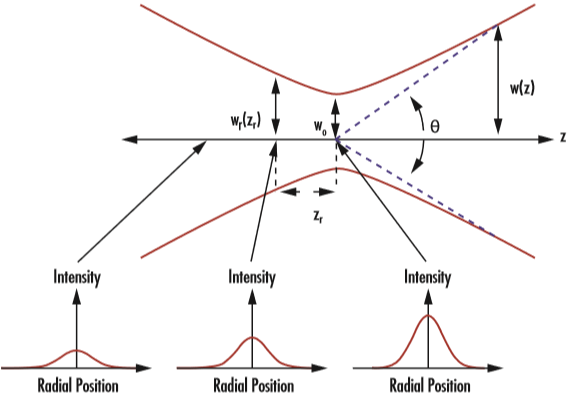
圖 2: 高斯光束是以其束腰 (w0)、雷利範圍 (zR), 及發散角 (θ) 定義
束腰區域的光束直徑變化定義為:
高斯光束的雷利範圍定義為 z 值,其中光束截面面積加倍。這會發生在w(z) 增加為 √2 w0時。雷利範圍 (zR) 可利用 公式 4, 表示為:
這也讓 w(z) 與 zR有關:
雷射波前在束腰處為平面,隨著與束腰區域的距離增加,會再次接近平面形狀。這種情形是因為波前曲率半徑開始接近無限大。波前曲率半徑在束腰處由無限大減少,到了雷利範圍時為最小值,然後遠離雷射時又再次回到無限大 (圖 3);這在束腰兩側都是如此。3
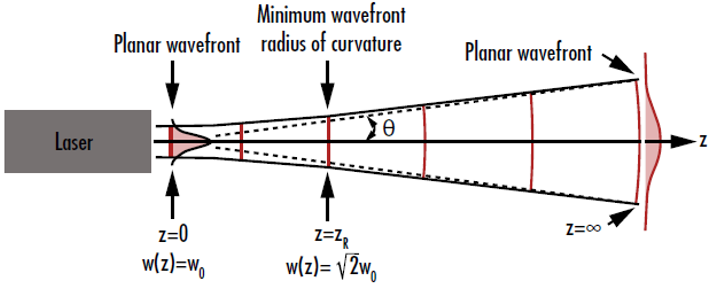
圖 3: 高斯光束的波前曲率,在距離束腰非常近及非常遠時都近乎於零
高斯光束操控
許多雷射光學系統需要操控雷射光束,而不只是使用「原始」光束。這可利用透鏡、反射鏡及稜鏡等光學元件完成。以下指南提出部分最普遍的高斯光束操控方式。
適合高斯光束的薄透鏡方程式
下列公式可說明理想薄透鏡的行為2:
在 公式 7中, s’ 是透鏡至影像的距離,s 是透鏡至物體的距離,f 則是透鏡焦距。如果物體和影像位在透鏡的相反兩側,則s 為負值,s'為正值。此公式忽略真實透鏡的厚度,因此只是真實行為的簡單近似值 (圖 4)。
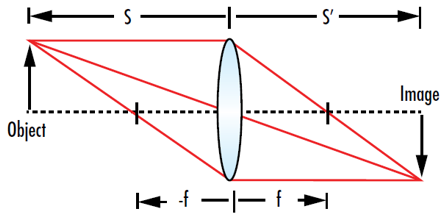
圖 4: 薄透鏡公式在已知透鏡與物件距離 (s) 及透鏡焦距 (f ) 的情況下,可判定影像位置 (s')
薄透鏡公式除了用於說明成像應用,也適用於高斯光束對焦;其中將輸入光束的束腰視為物體,輸出光束的束腰則視為影像。高斯光束通過沒有像差的理想透鏡後,仍然是高斯光束。Sidney Self 在 1983 年提出的薄透鏡公式,將高斯傳播列入考量4:
雷射至聚焦點總距離的計算方式,是將 s 絕對值與 s' 相加。 公式 9 也可利用無因次形式編寫,將兩側乘以 f:
此公式在 zR/f 接近 0 時,會接近標準薄透鏡方程式,因此標準薄透鏡公式可用於具有長焦距的透鏡。 公式 9 和 公式 10 可用於尋找穿越透鏡成像後的束腰位置 (圖 5)。
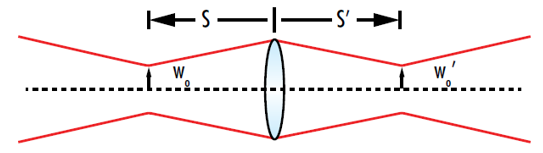
圖 5: 重新對焦高斯光束時的「物體」為輸入束腰,「影像」則為輸出束腰
A plot of the normalized image distance (s’/f) versus the normalized object distance (s/f) shows the possible output waist locations at a given normalized Rayleigh range (zR/f) (圖 6). This plot shows that Gaussian beams focused through a lens have a few key differences when compared to conventional thin lens imaging. Gaussian beam imaging has both minimum and maximum possible image distances, while conventional thin lens imaging does not. The maximum image distance of a refocused Gaussian beam occurs at an object distance of -(f + zR), as opposed to –f. The point on the plot where s/f is equal to -1 and s’/f is equal to 1 indicates that the output waist will be at the back focal point of the lens if the input is at the front focal point of a positive lens.
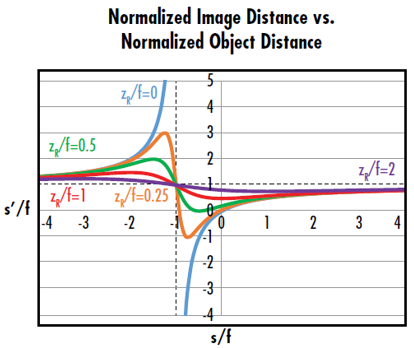
圖 6: The curve where zR/f=0 corresponds to the conventional thin lens equation. The curves where zR/f>0 show that Gaussian imaging has minimum and maximum image distances defined by the Rayleigh range
為了瞭解光束通過透鏡後的束腰及雷利範圍,必須瞭解系統放大倍率 (a),其公式為:
其中 w0 為透鏡前束腰, w0’ 為透鏡後束腰。這樣可重寫高斯光束的薄透鏡方程式,納入透鏡後光束的雷利範圍 (zR'):
如果透鏡位於束腰 (s=0),以上公式將會失效。平方放大倍率常數的反元素,可用於建立束腰大小及位置之間的關聯3:
高斯光束聚焦至一點
雷射材料加工及/或手術等許多應用中,將雷射光束聚焦至最小的點相當重要,以便讓強度達到最高,並盡可能減少加熱區域。在以上情況下,目標是將 w0' 降到最低 (圖 7)。修改後的 公式 13 可用於識別如何最小化輸出束腰3:
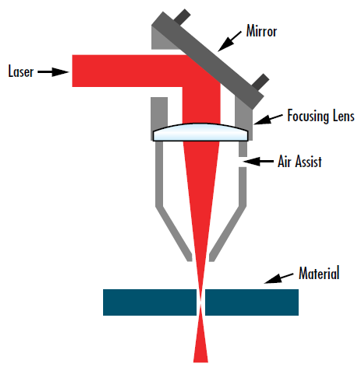
圖 7: 將雷射光束聚焦至最小尺寸,對各式各樣的應用相當關鍵,包括此項雷射切削配置
將兩側乘以公式左側的分母,然後再將兩側乘以 (w0')2, 公式 14 就變成:
解答 w0' 會產生:
減少透鏡焦距及 |s|-f 可將聚焦束腰最小化。公式 17 在 w0 旁邊的項,定義為另一種形式的放大倍率常數 α 以比較穿越透鏡後的輸入光束與輸出光束值 (圖 8)。3
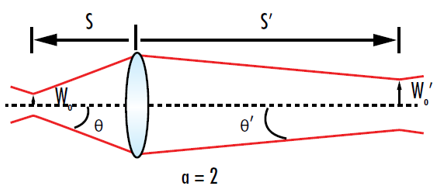
圖 8: 在放大倍率為 2 的情況下,輸出束腰將是輸入束腰的兩倍,而輸出發散則為輸入光束發散的一半
有兩種極限情況可進一步簡化計算輸出束腰大小及位置:s 遠小於 zR 及 s 遠大於 zR。3 透鏡若充分位於雷射雷利範圍內,則 s << zR 且 (|s| − f)2 < zR2。 公式 18 簡化為:
這也簡化輸出束腰及束腰位置的計算:
s >> zR時,透鏡至聚焦點的距離等於透鏡焦距。
其他極限情況為透鏡遠離雷利範圍之外,且 s >> zR, 則 公式 18
輸出束腰直徑簡化為:
與 s << zR, 時的情況類似,輸出束腰及束腰位置的計算也獲得簡化:
s >> zR, 時,透鏡至聚焦點的距離等於透鏡焦距。
直覺看來,這兩項結果都合理,因為光束波前在束腰及距離束腰非常遠的地方都接近平面。光束在這些位置幾乎是完美平行 (圖 9)。依據標準薄透鏡公式,平行輸入的影像距離等於透鏡焦距。
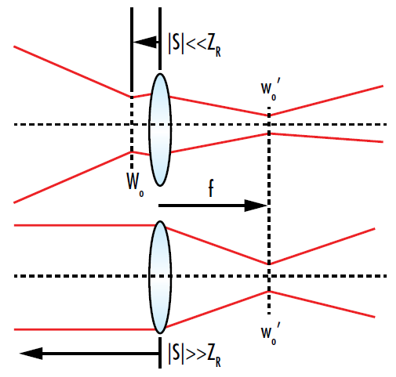
圖 9: 若輸入束腰距離透鏡非常近或非常遠,高斯光束通過透鏡後的聚焦點將位在透鏡焦點。這是因為輸入光束在這些點幾乎平行
高斯焦點位移
與直覺相反,在與透鏡保持固定距離 (L) 目標上對焦光束的強度,在束腰位於目標時並非最大值。實際上,束腰位於目標前的位置時,目標上的強度才是最大值 (圖 10)。這種現象稱為高斯焦點位移。
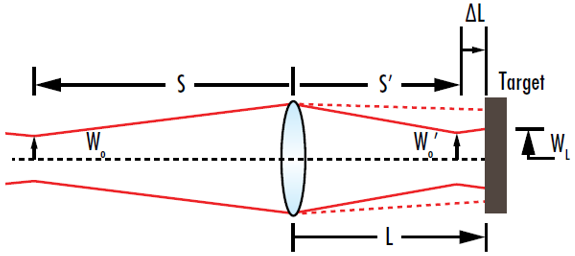
圖 10: 聚焦光束束腰在目標前的特定位置時,才會在目標產生最小光束半徑,聚焦束腰位在目標時則非如此
本文並不會說明其冗長來歷,不過目標的光束半徑可利用下列運算式說明4:
微分 公式 34 與對焦透鏡焦距 (f) 有關,用於解答 d⁄df [wL (f )] = 0 時的f ;其中顯示透鏡焦距會在目標產生最小光束半徑,因此強度最高。
隨著 |s| 接近零或無限大,f = L 時的 d⁄df [wL (f )] = 0 。在這兩種情況下,輸入光束幾乎平行,因此可推斷最小光束半徑會出現在透鏡焦點。
Collimating a Gaussian Beam
Achieving a truly collimated beam where the divergence is 0 is not possible, but achieving an approximately collimated beam by either minimizing the divergence or maximizing the distance between the point of observation and the nearest beam waist is possible. Since the output divergence is inversely proportional to the magnification constant α, the output divergence reaches a minimum value when |s| = f (圖 11).
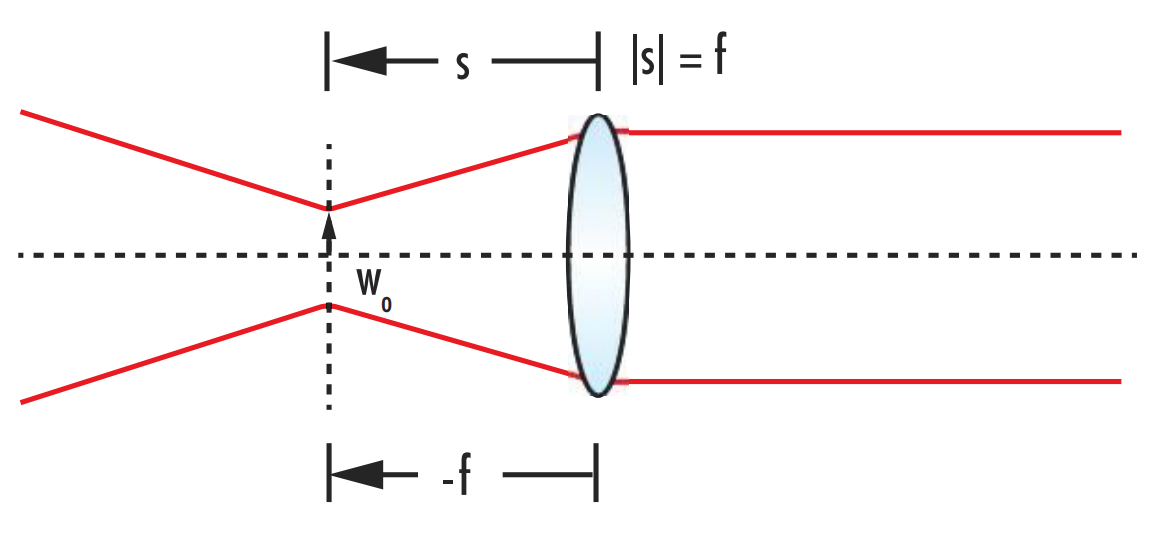
圖 11: To collimate a Gaussian beam, the distance from the beam waist to the collimating lens should be equal to the lens’ focal length

參考資料
- Paschotta, Rüdiger. Encyclopedia of Laser Physics and Technology(雷射物理與技術百科全書), RP Photonics, October 2017 www.rp-photonics.com/encyclopedia.html.
- Self, Sidney A. “Focusing of Spherical Gaussian Beams.” (球面高斯光束聚焦)Applied Optics(應用光學)第 22 卷第 5 期,1983 年 1 月。
- O'Shea, Donald C. Elements of Modern Optical Design(現代光學設計要素)。 Wiley,1985 年。
- Self, Sidney A. “Focusing of Spherical Gaussian Beams.” Applied Optics, vol. 22, no. 5, Jan. 1983.
- Katz、Joseph 及 Yajun Li。“Optimum Focusing of Gaussian Laser Beams:Beam WaistShift in Spot Size Minimization” (高斯雷射光束最佳聚焦:光斑大小最小化的束腰偏移)。 Optical Engineering(光學工程)第 33 卷第 4 期,1994 年 4 月,第 1152–1155頁,doi:10.1117/12.158232。
更多技術資源


or view regional numbers
QUOTE TOOL
enter stock numbers to begin
Copyright 2023, Edmund Optics Inc., 14F., No.83, Sec. 4, Wenxin Road, Beitun District , Taichung City 406, Taiwan (R.O.C.)
Privacy Policy | Cookie Policy | Terms & Conditions | Accessibility
California Consumer Privacy Act (CCPA): Do Not Sell My Information
The FUTURE Depends On Optics®